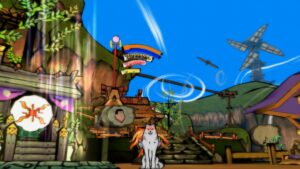
The Dolphin Blog is full of stories surrounding games, their development, and the challenges they present to emulate them. And in these stories, we sometimes have some recurring characters that we gain a better understanding of over time. Factor 5 and their Star Wars: Rogue Squadron games continue to amaze us time and time again as we find different ways that they push the hardware to its limits. The Legend of Zelda: The Wind Waker uses many graphical tricks to create a timeless style that surprises again and again with just how much care was put into every detail. And, of course the Metroid Prime series shows up often given its sensitivity to even subtle changes to emulation.
However, as with every story, there have to be villains as well. One such villain is the Disney Trio of Destruction™. For years, users have awaited the final showdown with these games. And guess what? They’re finally playable right now. But are these games truly villains? Or were they just misunderstood? In this report, we dive into The Disney Trio of Destruction™ once and for all to determine their true nature.
Not every returning character is a game. Sometimes we also have to deal with our own issues, such as Dual Core mode. It is constantly breaking games, disabled in many popular games by default, and the source of most crashes in Dolphin. But is Dual Core really a hack? Or is the dolphin simply doing something wrong? In this report, we’ll dive into the history of Dual Core and make a change that was long overdue.
On top of all of this, several longstanding features in Dolphin also saw some major upgrades, and we’ll also get to those throughout the Dolphin Progress Report. With that, let us begin.
NSOh No:
Since the release of the Nintendo Switch 2, we have been repeatedly asked if Dolphin supports the Nintendo Switch 2 NSO GameCube Controller. The short answer is not yet. The long answer is that Switch 2 controllers do some weird things; rather than take this on ourselves, we are waiting for the professionals at SDL to figure it all out. Currently they have an implementation, but it’s early and missing features. Once they get it to a good place and it is in an SDL release, we will adopt it into Dolphin.
Notable Changes:
Desktop: Enable Single Core by Default by JoshuaVandaele
It is no secret that Dual Core mode in Dolphin is unstable. If you’ve ever had Dolphin randomly crash while going into fullscreen, switching windows, or simply for no apparent reason, you’ve likely run into a Dual Core crash. In fact, pretty much any time someone comes to us with a crash, all of these issues were determined to be caused by Dual Core mode.
For all of its downsides, Dual Core is fast. Dolphin is largely bound by single thread performance, leaving the many cores of a modern CPU sitting idle. Splitting our primary emulation thread in two can spread the load across more cores and better fit modern CPU designs. This is very effective, and was in fact necessary in the early days to get playable speeds at all, and some users still rely on it even today.
Instead, we have tried to fix Dual Core repeatedly over the years. The most successful of those efforts was Synchronize GPU Thread (SyncGPU). Never heard of it before? Well, that’s because despite being the most successful of our efforts, it didn’t exactly catch on.
In a typical game, SyncGPU is in-between Dual Core and Single Core, in every sense. And that’s the feature’s biggest failing. It’s neither as stable as Single Core nor as fast as Dual Core, and ends up appealing to neither group. In a game with Dual Core instability that SyncGPU was designed to solve – Metroid Prime 2 in the graph above – it performs no better than Single Core mode, yet isn’t as stable. To make matters worse, the additional synchronization between threads creates stutters, so SyncGPU feels worse than Single Core or Dual Core.
DSP-LLE – Fix Recompiler Hangs by AdmiralCurtiss:
Back in 2022, xperia64 made a slew of improvements to Dolphin’s DSP accelerator code. Unfortunately, due to the difficulty of reviewing code like this and the fact that it had little in the way of visible results, it wasn’t merged right away. Additionally, earlier this year, a bug was found in the original pull request that caused audio to be missing in certain cases.
However, after finally receiving approvals from several reviewers along with additional fixes and testing, it was finally merged as 2503-509 as a seemingly low-risk addition before the next release. Even though this code would globally affect DSP-HLE, DSP-LLE Recompiler, and DSP-LLE Interpreter, we unfortunately didn’t test the less commonly used backends nearly as much as we should have.
While DSP-HLE and DSP-LLE Interpreter were both fine, oversights in how DSP-LLE Recompiler handled exceptions caused hangs in select titles after the improvements. While we don’t recommend using the DSP-LLE backends due to how performance intensive they are, there is one major reason to do so: Surround Sound support. Users using DSP-LLE Recompiler for that feature found that their games weren’t booting in the 2506 release.
After realizing what was wrong, AdmiralCurtiss jumped into action with two hotfixes to how the DSP-LLE Recompiler handled exceptions. One was simply updating the recompiler to allow for exceptions on store instructions, while the other had to do with exception flag handling in specific cases.
Game Patch: Defang the Disney Trio of Destruction by JosJuice and Billiard:
The Disney Trio of Destruction™. Much like the Four Horsemen of the Apocalypse before them, the Trio of Destruction™ are a fearsome group that bring despair in their wake. Once thought to just be ordinary games, we learned very quickly not to underestimate them. First, Toy Story 3 appeared. Then, Cars 2. And finally, Disney Infinity. By the year 2013, the unholy trinity was complete.And so our final battle with fate itself begins.
Each game challenged what was expected of a Wii game. Our efforts started with Toy Story 3, as it was the first of the trio to make it to the market in 2010 and did not work in Dolphin! The rest would be released before any of them worked. However, in 2014, Toy Story 3 would seemingly be defeated. A crack in the armor of the impenetrable three, we thought. Soon the others would fall, we thought.
How foolish we were:
Even after fixing Toy Story 3, the other two games would still fail shortly after boot. The failure was so spectacular that everyone thought that Dolphin had to be doing something very wrong. Never did we consider that perhaps we were doing exactly what the game wanted us to do.
This created a vulnerability.
All Avalanche had to do was tell the CPU to write garbage data into a region of memory where critical game code was stored. However, the game would write exactly enough garbage data to fill up the dcache without the CPU automatically flushing the changes to RAM. Then, the game would tell the CPU “never mind” and invalidate the dcache. Overwriting critical game code with garbage should leave the game non-functional, but the cache invalidation would prevent the garbage from ever reaching RAM! Dolphin, however, didn’t emulate the dcache, so the instruction would just immediately overwrite the critical code in RAM and disable the game.
Bluetooth Passthrough Improvements and Realtek Firmware Loading by Billiard:
While Wii Remotes (and Balance Boards) connect using standard Bluetooth, they have some quirks that make them difficult to use with other devices. Connecting Wii Remotes works pretty well on Linux, though it’s rather spotty on Windows. macOS has problems with even pairing Wii Remotes in the first place, as its Bluetooth stack doesn’t like Nintendo’s non-standard PIN codes. And you can forget Android entirely – while connecting Wii Remotes did work in the far past, it has been prohibited for some time. Sometimes, a Wii Remote will even just refuse to connect for unknown reasons, especially on Windows.
Assuming we can get the Wii Remotes connected, we still have to make some compromises to get things working. Nintendo made the odd decision to use the power-saving Bluetooth feature called “sniff mode” to adjust the Wii remote’s polling rate from 100Hz to 200Hz. Because “sniff mode” is a low level feature generally handled by the Bluetooth stack, regular applications are not able to control it. This effectively halves the rate at which we are able to poll the Wii Remote. Dolphin can duplicate input reports to “simulate” 200Hz and prevent games from getting upset over dropped inputs, but doing so can cause problems with motion control detection.
Download and install Dolphin Emulator on Windows:
There are two methods to install Dolphin Emulator on a Windows PC. The first is the traditional method, where you install it as a program on your computer and open it like any app. The other method contains the app in a folder that you place where you want and access as you choose. We’ll do both here.
Download the latest stable release
There are several versions available to download, but we recommend starting with the most recent release. You can also download the latest Dev release, which has some new features that the developers are working on. However, these may break things, and there are several Dev releases every day.
- Head to Dolphin Emulator’s download page.
- Find and select the most recent release. It appears at the top of the list.
- Hit the Windows x64 button to download.
- Once done, go to your Downloads folder and find your download.
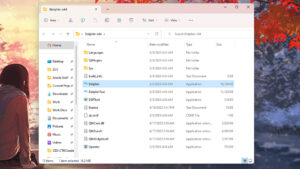
- Unpack the files to a convenient location on your hard drive.
- Once done, you’ll have a folder with many Dolphin Emulator files.
- It’s a portable application, so there is no installation. Double-click Dolphin, and the emulator opens.
Pro tip: Since it is a portable app, you can move the folder wherever you want for easier access. I usually stash it on the desktop, but you can even pop it onto a flash drive if you want to.
Download and install Dolphin Emulator on Mac:
This is very similar to the release version of Windows, where it’s a portable application, and you just need to open it. Again, you have the option to download the latest Dev release if you want to. Here are the steps.
- Head to Dolphin’s official website.
- Download the most recent release. Select the macOS (ARM/Intel Universal) button.
- Once downloaded, navigate to your downloads folder and find the Dolphin Emulator DMG.
- Double-click on the DMG to open it. Double-click on Dolphin to open the app.
- Note: It may throw a warning about it being an app downloaded from the Internet. Just hit Open to continue.
Set up a game directory (both PC and Mac):
Regardless of your method, you’ll want to create a folder to stash your game ROMs. This is a super easy process but a very necessary one. Otherwise, your Downloads folder is going to get crowded after a while.
- Create a folder to store your ROMs. If you emulate many systems, organize your files in subfolders.
- Open Dolphin Emulator and double-click where the window tells you to.
- Navigate to your Dolphin ROMs folder and select it.
- Dolphin will automatically add any GameCube or Nintendo Wii ROMs it detects once you add them.
Once you’re done, you need to add some ROMs. You’re on your own there, but Dolphin has a helpful page for ripping your own games. After that, you can set up your emulator and start playing.
How to play a game in Dolphin Emulator:
Once you obtain a ROM, put it in your ROM folder, and load up the emulator, things get pretty easy.
- Place your ROM in your ROM folder and open Dolphin Emulator.
- The emulator should automatically detect the new game.
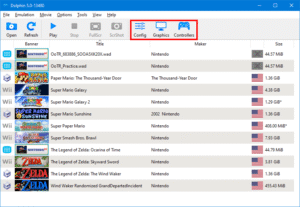
- Tap on the game, then tap the Play button on the top toolbar.
- The game should open and play.
Of course, some base configurations work fine out of the box, but you may want to configure it further before playing. We’ll show you how to do that next.
Set up and use Dolphin Emulator on Windows and Mac:
Luckily, Dolphin Emulator comes pretty well set up out of the box. It should play most games at good frame rates, with only minor adjustments needed depending on your computer. For example, the GameCube and Nintendo Wii controls come pre-mapped to your keyboard. You just have to learn which buttons do what. There is minimal setup needed to pop in and play, but we’ll still go over some common items for customization purposes.
While there may be some small changes between platforms, setup on Windows and macOS is nearly identical, and the same instructions should work 99% of the time between them.
How to configure a controller on Dolphin Emulator
Configuring your controls not only allows you to remap your keyboard to be more comfortable but also helps you learn what each button does. We recommend a wired GameCube controller along with a USB GameCube adapter. The three joystick configurations for the GameCube controller don’t translate well to mouse and keyboard. In any case, here’s how to configure everything.
- Open Dolphin Emulator.
- Tap the Controller icon along the top toolbar.
- There are two main sections here. The top section is for GameCube controllers, and the middle section is for the Nintendo Wii controller.
- Select Configure for the controller you wish to customize.
- On the next screen is every button a GameCube or Nintendo Wii controller is capable of pressing, along with all three joysticks. Remap the buttons and joysticks to your heart’s content.
- Optionally — If you want multiple controller profiles, locate the Profile box on the right side of the window, type in a profile name, and hit Save. You can save and load multiple profiles this way.
- Once done, hit OK when you’re finished.
- Note — The emulator will automatically switch between controllers depending on which game you’re playing.
The controller configuration screen definitely looks intimidating at first. We recommend taking your time and looking through everything. Don’t be afraid to tinker and mess around. You can always hit the Default button to restore everything to its original settings.
How to configure graphics settings on Dolphin Emulator
Graphics settings are set pretty well out of the box, and my PC and Mac had no problems running Super Mario Sunshine at max frames. However, your system may need some adjustments to get the best possible performance, so we’ll show you how to do that.
Standard graphics settings
- Open Dolphin Emulator.
- Select the Graphics option along the top toolbar.
- A window will open with four tabs, General, Enhancements, Hacks, and Advanced. Each tab has several graphics settings you can change.
- We usually list each change and what they do. However, Dolphin Emulator has tooltips that tell you what each option does if you mouse over it.
- Adjust the settings as necessary and hit Close when you’re done.
Pro-tip: One of the changes we recommend is increasing the Internal Resolution under the Enhancements tab if your computer can handle it. The higher resolution not only looks better but gives you a larger screen to play with. You can also try things like widescreen hacks to fill modern displays.
For the most part, it seems Dolphin is configured for efficiency out of the gate. Many graphical settings, like anti-aliasing, anisotropic filtering, etc., are at their lowest possible settings or turned off entirely. There doesn’t seem to be much to do if your FPS is too low, but there’s plenty to do if your machine can handle a higher workload.
Other configuration settings
Dolphin Emulator has some additional configuration settings you can access by tapping Options at the top of the window and then Configure. This houses some general configuration controls. You shouldn’t need to mess with this all that much, but it may help with troubleshooting if your emulator is bugging out. Below, we’ll talk about each tab in the Configure menu.
- General: These general configurations enable things like dual core, idle skipping, and usage statistics reporting. You shouldn’t ever need to touch anything in here, but you can if you want to.
- Interface: This gives you a few minor customizations to the emulator UI. For example, you can tick a box here that asks you to confirm you’re exiting the app before it lets you exit, preventing the loss of any saved data.
- Audio: As the name implies, this part of the menu deals with audio settings. You only need to change these options if the audio in your game is messing up.
- GameCube and Wii: Both of these tabs have console-specific options, like aspect ratio, memory cards, and other such things.
- Paths: This lets you add, remove, or change paths to your ROM folder. You can also define paths to Default ISO, DVD Root, Apploader, and Wii NAND Root if you want to.
- Advanced: The only option here is the ability to “overclock” your emulator. This increases framerates but also puts a much higher strain on your CPU. You can tinker with it if you want, but if your computer is already running games at the maximum framerate, we wouldn’t bother.
That’s about it for configuration. As we said earlier, the emulator comes set up pretty well out of the box, so aside from controller configurations and maybe increasing the graphics settings, there isn’t much to do to play.

Related Posts
Download FRAG Pro Shooter APK for Android – Free
A free shooter action game: FRAG Pro Shooter is a…
AI Chat Smith v8.250929.1 MOD APK
AI Chat Smith Smart Assistant (Chat Smith) is a super…